Showing posts with label DIY. Show all posts

Tuesday, November 1, 2011

Halloween Hangover

Man, Halloween is exhausting. And we didn't even go to any grown-up parties or bars; we just stuck with kid-friendly trick or treating and wholesomeness. Still, I am worn out. But I wanted to share these pictures of my little nerd goblins before too much time passed.

Graham was the solar system. I spray-painted a bicycle helmet bright yellow, then I painted styrofoam balls as planets and attached them with floral wire. I found inspiration here and just kind of tweaked their design to fit my kid's OCD issues and big head.


We ended up having to put a ski cap on under the helmet to keep it stable. It had been sliding around on his head and endangering the planets.
This is the creepy face he makes when he knows he's being photographed.

I kept with the spacey theme (not Kevin Spacey, but maybe that will be our theme for next year) by dressing Dean as a rocket. This costume cost less than a dollar. I used an old car windsheild shade thing we had lying in the basement. I just cut out the shape of a rocket and affixed red felt to it. We pinned the cutout to Dean's Baby Bjorn, and he peered out of the little window cutout. Easiest costume ever.


He actually kind of loved it!

This was only Graham's second time to trick or treat, and he was really into it this year. The costume held up okay (Uranus fell off, har har), but he was happy to remove the helmet by the end of the night.


Graham got a bag (well, an alien head?) full of candy, so he was thrilled. He kept sneaking more and more candy, as well as these eyeball cake pops I made.


By the end of the night, Seth and I were just happy he hadn't thrown up. Yay, Halloween. Pin It

Tuesday, August 30, 2011

Plastic Fantastic (nothing rhymes with orange, so . . .)


This all began when Seth and I took Graham to a birthday party at one of those crazy, inflatable, bounce-overload places. Seth walked Graham in, and I stayed in the car to feed Dean. My eye began to wander along the sidewalk of the strip mall where the bouncy place was located, and I spotted a Goodwill. Sitting on the sidewalk in front of Goodwill were some grimy-but-cute chairs, the molded plastic kids' kind.

They were pretty gross, but they were cheap, so I hauled the baby over there, bought the chairs, and maneuvered the stroller back to the car while carrying two chairs. (Side note: I am determined not to buy a new minivan or SUV, but damned if it's not hard to fit two adults, two carseated kids, and ANYTHING ELSE into a Honda Accord).

Somehow we got them home (I think one fit into the trunk, and I had to hold one, upside down, in my lap). Yep, still grimy.


But again, super cheap:


I busted out the soap and water, followed by my beloved Magic Eraser and some elbow grease. After that, they looked . . . slight less grimy? But I like them. I knew I wanted to put them in Graham's ever-so-slowly-coming-together room. We're hanging maps in there with lots of orange in them, and he's outgrown the chair that's currently in there.


I also want to do something about these nastay legs--either spray paint them or take a Brillo pad to them and scour off all the remaining peely black paint. But I'm excited to show you how they'll look in Graham's room.


Pin It

Friday, August 12, 2011

The Closest I'll Get to Sewing

Wow, what a total shock yesterday to find my hallway featured on Apartment Therapy! I totally felt like doing the "We're Not Worthy" dance from Wayne's World (and some of those commenters would probably agree, ha. But I can't say that I care. It's just a floor, folks). Anyway, welcome! If I got three new readers from that, then my subscribers have doubled!

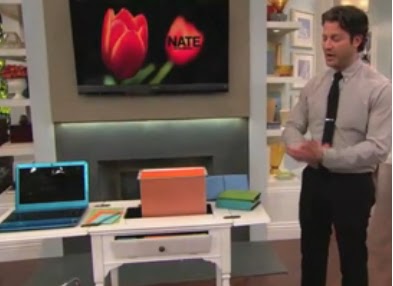
So. I am still working on happying up the hallway (remember, these things take eight years time), but my mental home-project checklist is very all over the place right now. I was hunting for picture frames at some neighborhood thrift stores last week, and I spied a super-cute sewing table. I haven't bought it (yet--I'm waiting for half-price day and hoping it's still there), but it reminded me of this genius idea I saw on the Nate Berkus show a while back:


The object of my affection is around 3/4 of the way through. Did you see it? (Smudgy screencaps to follow, but if you've read this blog for any length of time, you are no stranger to smudgy photos.)

Nate (or one of his production assistants) took this sewing table

And made it into this adorable, handy workstation!


When the little file box hinged and folded into the spot reserved for the showing machine, I squealed. (Seriously. I'm not proud of that.)

The whole thing folds up to a teensy little table that is just begging to go in my guest room..

The only problem is, I gave up that guest room for Kid #2 (gah, babies are so selfish, taking away my extra decorating space and stuff). BUT! Seth and I just made a Very Big Decision to dig our heels in and stay in our teeny house in our beloved neighborhood. We decided that if we were going to live there a long, long time, we would invest in making it work for us. Last week, we closed on a refinance that will allow us to convert our unfinished attic into a master suite (waaaaay more to come on this, whether anyone wants to hear about it or not).

After I got over the initial shock and delight that we would have TWO bathrooms, and that my closet would actually be in the SAME ROOM as my bed AND would be larger than a phone booth, I also realized that our current bedroom (and its miniature closet) would be all freed up! The return of the guest room! Well, we typically have two guests per year (hi, Marianne), so it will be used for a little more than that--probably a combination guest room/office/playroom/place to pass out when the kids wake us up in the middle of the night. But I have already been dreaming of what to do with it. There may have been Orla Kiely fabric purchased.

I'm adding this little sewing table project to the Adorably Decorated Guest Room in My Head. Pin It

Wednesday, August 3, 2011

Walkin' on Sunshine

Ah, everything always seems so simple in the beginning, doesn't it? Before the third coat of primer, and the fourth re-application of tape? And the running out of tape? And the incorrect combinations of oil and latex paint, in an attempt to save money? And the yelling at the husband and son that "NOBODY GOES TO THE BATHROOM FOR ANOTHER HOUR!" Ah hahaahhaa haaa HA.

Anyway, it turns out that no, it's not easier to use the natural pattern of the floor, and that yes, stencils would have been a hell of a lot easier. But, after approximately 31 coats and nine hours of my life, there was no turning back.

First, I painted a couple different stripes with primer, just to see which width I preferred. After I decided on the narrower stripe, I marked off those widths down the length of the floor with sharpie.


Then I thought I would "paint" alternating zigzags so they would show through the primer, helping me keep track between coats.

Then I primed over those zigzags. They showed through as I hoped they would.

Then I planned to paint the white zigzags over these primer stripes, tape off the rest, and fill in the empty stripes with a marigold color. But using a brush wasn't giving me the smooth result I wanted, so I did the thing I'd been trying to avoid the whole time: taping everything off.

At this point, I was so hunched over from putting down tape that I looked like this:

And because of that, and because I was honestly loving the Painters Tape Blue with the white, I suggested that we just polyurethane over the floor as-is and be done with it. But I couldn't convince anyone else of this. (Will someone else paint their floor blue and white for me? Because I really, seriously love it.)

Then, nine hundred more coats of white (which messed up my pretty blue chevrons). In an effort to save money, I used some semi-gloss latex that we already had--Behr Elegant White. This is what's on all the trim in our house.


Then MORE taping (and my second tearful apology to my husband for "always messing with everything like this. But I just want things to be pretty."

And three coats of yellow paint, FOUR rolls of painters tape, and countless leaps from our bedroom doorway to the vent cover to the bathroom door later, I'm done. Kind  of.


I have lots of touching up to do, I need to paint that return vent white (I think?), I need to coat the whole mess with a layer of polyacrylic or polyurethane or something, AND I need to put quarter round trim on. But the hallway is already so much lighter, brighter, and happier.

And now for some good ol' before-and-after (well, before and during?) action.

I'm also hoping to get a real, non-prison-issue light fixture and hang some photos and artwork, but let's remember that this part took me a year (well, eight years since we bought the house), so let's be realistic.
Pin It

Thursday, July 28, 2011

Slightly Less Miserable

Well, I shared my disgusting Hallway of Sadness a while back a YEAR AGO. And then I hemmed and hawed over which  stencil to choose, and then I was too cheap to buy the one I wanted. AND THEN I decided, why buy a stencil, when painter's tape is so much cheaper, and stripes only require tape and patience?

I mean, that is a good-lookin' floor. Via Little Blue Chairs. 
I was looking at my nasty ol' fake parquet floor, trying to decide how far apart to space the stripes, what colors, etc., when it occurred to me that the parquet pattern would lend itself to something kind of awesome.


Do you see it? No, not the filth and sadness; the pattern that finally jumped out at me. Let me back up a bit.
I am fully on board the chevron/zig-zag love train. Half of my pins on Pinterest reflect this.

From Chez Larsson. Swoon.
 And I wanted to buy this Urban Outfitters light blue zigzag rug for Dean's nursery, but as with all things Urban Outfitters, it sold out in the thirty minutes between the time I first saw it and the moment I decided to purchase it.


So, when I was looking all cross-eyed, magic-eye-style at the Hallway of Shame, I was delighted (well, as delighted as one could be in the Pit of Despair) when this occurred to me:


Eh? EH? And would you believe, I am NOT a graphic designer? Seriously! I know--It's some sort of innate gift. Anyway, I know you thought there wasn't a way to make that hallway look sadder, unless some tool put Paint lines on it. But you get where I am going, I hope.

Then I consulted the wise and powerful Internets, because there is nothing new under the sun, and I knew someone would have already painted yellow and white zig zags/chevrons/Charlie Brown stripes/whatever the kids are calling them these days on a floor, and lo and behold this prettiness:


From Ish and Chi.

So yes. YES. Sign me up. I am sanding tomorrow, priming tomorrow night, and then making everyone leave the house on Saturday while I close off half of the rooms to paint these suckers. And hopefully by Monday (or perhaps  July 2012) I will have a new floor to show you. Pin It

Tuesday, June 14, 2011

Lil' Dee Dubya--Artwork in the Nursery


When I was pregnant with Graham, I tried to think of some fun way to display his name in his room. Then I gave up and went with the ubiquitous wooden letters over the crib solution. I think it's cute but nothing new.

With this new little nugget, I thought I might try initials instead. I had seen a few typography posters here and there and on Etsy, but none offered something I liked in the letters and colors I was looking for. I thought I might as well try my hand at creating something with whatever s(crap) I had lying around--it's free, and if I ended up not liking it, I could still go buy something else.

I had a lot of scrapbook card stock left over from Mimi's baby shower, some of it conveniently in red and turquoise. I searched online for silhouettes of images I liked, a deer (well, a fawn, because baby animals are cute. Except baby scorpions, which I learned last week. Thanks a lot, Zooborns.) and a wagon (being pulled by a little boy! Or a girl with kind of a mullet, whatever), to correspond with D and W. (New baby's name is Dean--have I said that here? Probably not, since my mother is the only one who reads this, and she already knows his name. Anyway, welcome, Dean Eliot!) I printed them out, cut them, traced them onto the white card stock, cut them again, swatted Graham away when he kept trying to take them, cut out some more for him to play with (of course he had lost interest by then). I then did the same thing with the upper- and lowercase letters for D and W (you could do this with a die-cut machine, if you have a font you like, but I just wanted old-school Times New Roman and I didn't want to pay $50 for a Cricut cartridge for four letters).


Card stock tends to come in weird sizes at the craft store. My sheets are all 12x12, which I thought I would need to trim to 8x10 to fit a standard picture frame, but then I remembered that we had some random LP frames lying around the basement that might work!


This is the LP Seth had chosen to frame. Hmm, I can't imagine why this never made it up on to any of our walls.


I spray painted them white. Then, I pieced together some pieces of white cardstock to fill the gaps around the edges--fake matting, if you will.


For the space behind the glider, I commissioned some lithographs from a local underground artist. I'm totally kidding--I found these for 3.49 apiece on clearance at Target. I am so lame. But look, a scooter--we have one of those!


And a bike--we may even have two of those. It's been a while since I've visited that corner of the Hoarder Basement beneath my house. Sorry, bikes. Anyway, I pretty much had to buy these at $3.49 apiece. I couldn't have made anything that cheaply.

The other little piece of artwork currently in the nursery is an adorable painted canvas from my sister Mary Ruth--a cute take on  "See No Evil, Hear No Evil, Speak No Evil" featuring sock monkeys, hanging over the dresser/changing table. (Better picture of it to  come soon.)

I have a couple other art-y things to put in the nursery, and if I ever get around to finishing them, you'll be the first to know. Pin It

Nursery: As Good As It Gets

Or rather, as good as it's going to get. I am out of time and patience and funds. Here's Baby 2.0's new digs!


Sources.

Crib: Ariel Stages crib, originally from Target 2007, hand-me-down from Graham

Bedding: bumper and skirt made by my mom with Moda Funky Monkey fabric via fabric.com; sheets from Koala baby

Bookshelf: Dolce shelf from Target, circa 1998. Has followed me around since college. Painted white. Red fabric bins are Closetmaid, $6 apiece, available at Target and Lowe's.

Glider/Rocker and ottoman: Dutalier via Craigslist three years ago, $60. Painted white; cushions recovered with red microfiber from JoAnn.

Robot pillow: gift from sister-in-law, handmade by via Old Made Good shop in Nashville.

Dresser: vintage Bassett via Craigslist, $30. Painted with high gloss Candy Apple Red from Glidden.

Rug: Ikea Sveje, no longer available, $12. (If anyone spots another one, please tell me! I want one more because just one is really too small for the space.)

Window valances: Target, $11 apiece.

Roller shades: KMart, $10 apiece. I hate these, by the way.

Lamp: Adesso Millennium Wood Spindle lamp, originally in our living room. Shades replaced (after Graham shattered the original ones) with JC Penney drum shades.

Corner table: Lowe's (?), circa ten years ago. We used it in the kitchen of our first apartment after we were married. I think it may have been $18 back then. It has lots of random paint splatters on it that I try to hide with books or lamps.

Light Fixture: Lowe's, $42.

Artwork (more on this later): various--made by my sister, made by me, purchased from the Target. Pin It